The Raspberry Pi is a tiny computer that’s packed with potential, making it perfect for learning about electronics, programming, and even creating your own gadgets.
It’s affordable, versatile, and has a vibrant community of enthusiasts ready to help you along the way.
Learning about Raspberry Pi can open doors to exciting projects like building a home automation system, controlling robots, or even creating your own games.
Finding the right Raspberry Pi course on Udemy can feel overwhelming.
You want something that’s comprehensive, engaging, and taught by experts who understand both the hardware and the software, but also something that’s tailored to your specific learning style and goals.
For the best Raspberry Pi course overall on Udemy, we recommend Ultimate Guide to Raspberry Pi : Tips, Tricks and Hacks.
This course provides a well-rounded introduction to the Raspberry Pi, covering everything from setting up the hardware and software to programming with Python and building exciting projects.
While this is our top pick, Udemy has a variety of other great options available.
Whether you are a complete beginner or are looking to learn more about a specific topic, there’s sure to be a course that’s perfect for you.
Keep reading to explore our full list of recommendations and find the course that will help you unlock the power of the Raspberry Pi!
Ultimate Guide to Raspberry Pi : Tips, Tricks and Hacks
You will start by learning what a Raspberry Pi is and its capabilities.
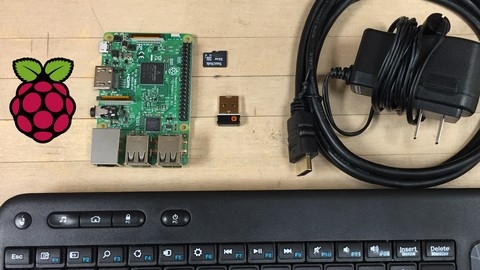
The course covers setting up the hardware, including connecting components like a monitor, keyboard, and mouse.
If you don’t have extra peripherals, you’ll learn how to set up the Pi in headless mode using an existing computer.
A significant portion is dedicated to working with SD cards, which are essential for the Raspberry Pi.
You’ll understand how to choose the right SD card, flash the operating system (like Raspberry Pi OS, formerly Raspbian) using tools like Etcher or the Raspberry Pi Imager, and troubleshoot common issues.
The course teaches you how to configure the Raspberry Pi OS, connect remotely using SSH, VNC, SFTP, and even Remote Desktop Protocol (RDP) from Windows.
You’ll become proficient with the Linux terminal, learning essential commands for file management, networking, and system information.
Installing software is made easy with an introduction to the APT package management system.
You’ll learn to set up web servers like Apache and PHP, enabling you to run web applications on your Raspberry Pi.
A major focus is working with the Raspberry Pi’s GPIO (General Purpose Input/Output) pins.
You’ll build circuits with components like LEDs, buttons, and PIR (Passive Infrared) sensors, controlling them using Python code.
Projects include blinking an LED, detecting button presses, building a simple alarm system, and even creating an Amazon Echo clone using the Alexa Pi software.
The course also covers working with cameras, including USB webcams and the official Raspberry Pi Camera Module.
You’ll learn to capture images, record videos, and apply special effects programmatically.
Throughout the course, you’ll gain hands-on experience by wiring circuits, writing Python code, and reviewing the code to understand how it works.
The course provides a solid foundation for exploring the vast potential of the Raspberry Pi, whether for home automation, robotics, or other creative projects.
Raspberry Pi For Beginners - 2024 Complete Course
You’ll start by learning how to set up the Raspberry Pi OS without needing an external monitor or keyboard, which is very convenient.
Once you have the OS installed, you’ll dive into programming with Python3.
The course covers variables, functions, conditions, loops, and lists - essential building blocks for writing programs.
You’ll apply these concepts through hands-on activities like creating functions and validating user input.
Next, you’ll build your first circuit with an LED and resistor on a breadboard.
This practical experience will teach you how to safely work with the Raspberry Pi’s GPIO pins and control components like LEDs and buttons using Python code.
You’ll even create a simple motion detector with a PIR sensor.
The course also guides you through using the terminal, a powerful tool for navigating the file system, editing files with Nano, installing software, and running Python scripts.
You’ll learn how to send emails from your Raspberry Pi, including adding attachments.
Adding vision capabilities is made easy by integrating the Raspberry Pi Camera Module V2.
You’ll capture photos and videos both from the terminal and with Python code.
To wrap things up, you’ll build a web application using the Flask framework, allowing you to control the Raspberry Pi’s GPIO pins over a web interface you create.
The final project brings together everything you’ve learned in a culminating hands-on activity.
Raspberry Pi Full Stack

This course provides a comprehensive introduction to building a full-stack web application using a Raspberry Pi.
You will start by learning about the Raspberry Pi hardware, its specifications, and how it compares to other boards like Arduino.
The course then guides you through setting up the Raspberry Pi operating system, enabling SSH and configuring Wi-Fi for headless mode.
You’ll learn how to back up and restore your SD card to recover from any issues.
Moving on, you’ll dive into Python programming on the Raspberry Pi, exploring the GPIO pins and how to control them using Python libraries like RPi.GPIO.
You’ll wire simple circuits, control LEDs, read button inputs, and interface with sensors like the DHT22.
The course covers setting up the web application stack, including installing Python 3, creating a virtual environment, and configuring Nginx and uWSGI.
You’ll learn how to work with Flask, a Python web framework, and style your application using the Skeleton CSS boilerplate.
Building the web application is a key focus, where you’ll create a database to store sensor data, capture readings using Python scripts scheduled with cron, and display the data in the browser.
You’ll implement features like date range selection, URL querystring validation, and integrate Google Charts and datetime picker widgets for better data visualization.
The course also covers handling time zones using the Arrow library, linking application pages, and charting with the powerful Plotly library.
You’ll learn how to set a static IP address and expose your application to the internet using port forwarding.
Throughout the course, you’ll gain hands-on experience with various tools and technologies, including Git, SFTP, server-side and client-side debugging techniques, and more.
The course concludes with a bonus lecture and an update section covering the latest changes and improvements to the application.
Build your own GPS tracking system-Raspberry Pi Zero W 2024
You’ll start by learning about the Raspberry Pi Zero W hardware and how to set it up, including installing the operating system, configuring WiFi and SSH access without a monitor, and setting a static IP address.
This hands-on approach ensures you understand the fundamentals before diving into the project.
Next, you’ll test the GPS module and learn about the GPS working principles.
You’ll assemble the circuit and use different methods to test the module on Windows.
The course then guides you through installing and configuring GPSD (GPS Daemon) on the Raspberry Pi to interface with the GPS module.
Once the hardware is set up, you’ll write Python code to fetch raw GPS data and extract the required information like latitude, longitude, and speed.
You’ll even learn how to check if a string is a palindrome or generate secure passwords through coding exercises.
The real fun begins when you build an IoT dashboard to visualize the GPS data in real-time.
You’ll learn about IoT, data analytics, and how to send data to web servers like Ubidots.
The course covers configuring the dashboard, automating the program to run on boot, and even an advanced IoT dashboard that displays the location address.
Throughout the course, you’ll find circuit diagrams, real-time demos, and source code to reinforce your learning.
The lectures are designed to be engaging, with concepts explained clearly using simple language.
You’ll gain practical skills in areas like Linux, programming, and IoT while building a functional GPS tracking system.
Raspberry Pi, Python, and Electronics Bootcamp
You’ll start by learning about the different Raspberry Pi models and how they compare to the Arduino Uno.
Next, you’ll dive into setting up the Raspbian operating system on your Raspberry Pi.
This includes installing essential software like IDLE3 for writing Python code and configuring remote access with VNC so you can control your Pi from another computer.
The course covers the various pins and communication protocols on the Raspberry Pi, like UART, SPI, and I2C.
You’ll learn about electronic components too, like breadboards, jumper wires, LEDs, and resistors.
With that foundation, you’ll then program the Raspberry Pi’s GPIO pins to control LEDs.
Projects include blinking an LED, sending an SOS message with morse code, alternating between LEDs, and creating a chaser circuit.
You’ll use the Fritzing software to design and simulate your circuits.
The course provides downloadable code bundles so you can follow along easily.
There’s even a bonus section with additional content.
Throughout, you’ll be writing Python code to control the Raspberry Pi’s hardware.
This hands-on approach makes it an engaging way to learn about the Pi’s capabilities while building practical programming skills.
Raspberry Pi Bootcamp : For the Beginner
The course provides a comprehensive introduction to the Raspberry Pi, guiding you through setting up the hardware and software, programming with Python, and building exciting projects.
You’ll start by learning about the Raspberry Pi itself and the necessary components.
The course walks you through downloading the Raspberry Pi OS (formerly Raspbian) and flashing it onto a micro SD card using tools like Etcher or the Raspberry Pi Imager.
You’ll connect the components, configure the OS, and explore remote access options like SSH and VNC.
Next, you’ll dive into programming the GPIO (General Purpose Input Output) pins using Python.
You’ll wire up circuits with components like LEDs and control them programmatically, even building a web interface to toggle the LED from a browser.
The course then guides you through setting up a retro gaming system with RetroPie, covering the required hardware, downloading ROMs, configuring gamepads, and playing classic games.
One of the highlights is creating a Google Home clone using the Google Assistant API.
You’ll prepare the SD card, connect components like a microphone and speaker, configure the software, and set up authentication with the Google Cloud Console to bring your digital assistant to life.
Throughout the course, you’ll learn practical skills like installing web servers (Apache), programming languages (Python, PHP, HTML5), and working with the sudoers file for advanced privileges.
The course also covers bonus topics like understanding different Raspberry Pi models, powering projects with external sources, and the differences between Arduino and Raspberry Pi.
Computer Vision on Raspberry Pi - Beginner to Advanced

This course is an immersive journey into the world of computer vision and deep learning on the Raspberry Pi.
You’ll start by learning the fundamentals of Python programming, including loops, conditions, functions, and data structures.
This lays the groundwork for diving into computer vision applications.
You’ll explore various image processing techniques like scaling, flipping, brightness adjustment, bitwise operations, blurring, sharpening, thresholding, erosion, dilation, edge detection, and segmentation.
These concepts are essential for understanding how computer vision algorithms work.
The course then takes you to the exciting realm of real-world applications.
You’ll learn to detect human faces, eyes, noses, cars, pedestrians, and objects in real-time video streams.
Additionally, you’ll dive into face recognition algorithms, a crucial technology in security and surveillance systems.
The course also introduces you to the powerful world of neural networks using Google Colab.
You’ll understand activation functions, optimization techniques, gradient descent, and the inner workings of convolutional neural networks (CNNs).
You’ll even get to train a CNN on the famous MNIST dataset.
Furthermore, the course provides a treasure trove of free online resources for exploring advanced topics like deep learning, generative adversarial networks, reinforcement learning, machine learning, data science, TensorFlow Lite, Movidius Neural Compute Stick, quantum machine learning, and the mathematical foundations of these fields.
Throughout the journey, you’ll work on hands-on image processing assignments on the Raspberry Pi, solidifying your understanding of computer vision concepts.
This course equips you with the skills to tackle real-world problems and stay ahead in the rapidly evolving field of artificial intelligence.
ARM Raspberry Pi Assembly Language From Ground Up™
This course provides a comprehensive introduction to ARM assembly language programming on the Raspberry Pi.
You will start by learning the fundamentals of computing devices, number systems, and assembly tools.
The course then dives into the RISC design philosophy behind ARM processors and explores ARM’s unique features like bus technology, memory management, and coprocessor extensions.
To get hands-on, you’ll learn how to remotely access your Raspberry Pi using SSH or Remote Desktop Connection, and set up the CodeBlocks IDE for writing assembly code.
The programmer’s model section covers essential concepts like data types, registers, data flow, and the ARM processor family.
You’ll gain a solid understanding of assembler rules, directives, and the different ARM instruction sets.
The course teaches you how to assemble, link, run, and debug programs using the Raspberry Pi terminal and the GDB debugger.
Coding examples reinforce concepts like allocating memory, swapping registers, and renaming registers.
Load-store instructions form a crucial part, covering pre/post-indexed addressing, endianness, and defining memory areas.
You’ll learn techniques for dealing with constants and literals, such as using the MOV instruction’s rotation scheme, MOVW/MOVT instructions, and loading labels with ADR/LDR.
The arithmetic and logic section explores flags, boolean operations, shifts, rotations, addition, subtraction, bit manipulation, saturated math, multiplication, and division instructions.
You’ll also learn about DSP instructions and fractional/Q notation.
Branching and looping are essential for control flow, so you’ll study branch instructions, compare-and-branch, loops, and conditional execution.
The course covers working with tables, including navigating lookup tables.
Finally, you’ll learn about the stack and related instructions like LDM, STM, PUSH, and POP.
Coding examples integrate multiple concepts, like solving equations and finding maximum values in datasets.
Homebaked | Raspberry Pi + Django Home Server
This course takes you on a comprehensive journey to set up a Raspberry Pi as a home server using Django, a popular Python web framework.
You will start by learning about the required equipment, including the Raspberry Pi itself and other necessary components.
The course will guide you through downloading and installing the Raspbian Jessie Linux operating system on your Raspberry Pi’s microSD card.
Once the OS is set up, you’ll learn how to find your Pi’s IP address, connect to it securely using SSH from another computer, and perform necessary updates and installations, including Django.
A significant portion of the course focuses on setting up Apache2 as a web server and integrating it with Django and mod_wsgi.
You’ll also learn how to use FTP clients like Cyberduck and Transmit to transfer files between your computer and the Raspberry Pi for long-term production use.
The course then dives into building a Django project called “Django Pi Time,” a time-tracking application.
You’ll create models, views, and forms, handle user authentication and permissions, integrate Bootstrap for styling, and implement various features like toggling user activity, validating actions based on time, and displaying all users’ activities.
Throughout the project, you’ll learn about essential Django concepts such as serving static files, working with the admin interface, creating model managers, and using decorators for login and staff requirements.
After completing the Django project, the course will guide you through integrating the pre-existing project with your Raspberry Pi.
This includes updating database permissions, running tests on the Pi, and exploring the integration of GPIO (General-Purpose Input/Output) with Django.
Run Your Trading Robot on a VPS or Raspberry Pi 24/7

The course covers setting up a Raspberry Pi and installing the popular Freqtrade bot on it.
You’ll learn how to unbox the Raspberry Pi, install the operating system, connect it to the internet, and set up a static IP for remote access via SSH.
Once the Raspberry Pi is set up, you’ll dive into installing Freqtrade and running it as a background process using either the Forever tool or systemd.
The course also guides you through transferring your trading data to the Raspberry Pi and backing up the entire system image for safekeeping.
While the Raspberry Pi offers advantages like low power consumption and cost, the course acknowledges its limitations too.
As an alternative, you’ll explore virtual private servers (VPS) and learn how to create one on Vultr, a popular VPS provider.
You’ll then install Freqtrade on the VPS and run it continuously.
The course touches on the benefits and drawbacks of using a VPS compared to a Raspberry Pi.
It even covers cloud services tailored for traders, giving you a well-rounded understanding of different hosting options for your trading bot.
Throughout the journey, you’ll encounter warnings about potential scams and minor code changes to Freqtrade.