
Looking to use LightGBM for multiclass classification in Python but unsure of how to proceed?
This tutorial is designed to get you up to speed.
I’ll guide you through each step, from data preparation to model building, training, and evaluation.
By the end of this tutorial, you will be ready to apply these steps to your own projects.
So, let’s dive right in!
Installing LightGBM in Python
Before we dive into the main content of this tutorial, let’s first ensure that you have the LightGBM library installed in your Python environment.
You can install LightGBM either using conda or pip.
If you’re using an Anaconda distribution, you can install LightGBM by using the following command in your terminal:
conda install -c conda-forge lightgbm
If you prefer using pip, run this command:
pip install lightgbm
After running one of these commands, LightGBM should be installed and ready for use in your Python environment.
Preparing the Data
The first step in any machine learning task is to load the data.
In this tutorial, we’ll be using the Red Wine Quality dataset.
This dataset is a compilation of various characteristics of red wine, such as acidity, sugar level, and alcohol content, along with a quality rating from 3 to 8.
The quality rating can be seen as a ranking variable, which is a type of ordinal variable.
We’ll use the pandas library to load the data.
Pandas is a popular data manipulation library in Python that provides flexible data structures for manipulating and analyzing data.
import pandas as pd

# Load the dataset
data = pd.read_csv('winequality-red.csv')
| fixed acidity | volatile acidity | citric acid | residual sugar | chlorides | free sulfur dioxide | total sulfur dioxide | density | pH | sulphates | alcohol | quality |
|---|---|---|---|---|---|---|---|---|---|---|---|
| 7.4 | 0.7 | 0 | 1.9 | 0.076 | 11 | 34 | 0.9978 | 3.51 | 0.56 | 9.4 | 5 |
| 7.8 | 0.88 | 0 | 2.6 | 0.098 | 25 | 67 | 0.9968 | 3.2 | 0.68 | 9.8 | 5 |
| 7.8 | 0.76 | 0.04 | 2.3 | 0.092 | 15 | 54 | 0.997 | 3.26 | 0.65 | 9.8 | 5 |
| 11.2 | 0.28 | 0.56 | 1.9 | 0.075 | 17 | 60 | 0.998 | 3.16 | 0.58 | 9.8 | 6 |
| 7.4 | 0.7 | 0 | 1.9 | 0.076 | 11 | 34 | 0.9978 | 3.51 | 0.56 | 9.4 | 5 |
This code will load the data from the CSV file into a pandas DataFrame.
A DataFrame is a two-dimensional labeled data structure with columns of potentially different types.
Splitting the Data into Training and Testing Sets
Once we have loaded the data, we need to split it into a training set and a testing set.
The training set is used to train the model, while the testing set is used to evaluate the model’s performance on unseen data.
We’ll use the train_test_split function from the sklearn.model_selection module to split the data.
from sklearn.model_selection import train_test_split

X = data.drop('quality', axis=1)
y = data['quality']

# Split the data into training and testing sets
X_train, X_test, y_train, y_test = train_test_split(X, y, test_size=0.2, random_state=42)
We first split the data into features and labels.
The features are the columns that we will use to train the model, while the labels are the column that we want to predict.
Then we split the data into a training set that contains 80% of the data and a testing set that contains 20% of the data.
The random_state parameter ensures that the splits generate are reproducible.
Building the Model
Now that our data is ready, let’s move on to building the model.
Three important hyperparameters to set when using LightGBM are the learning rate, the number of estimators, and the number of leaves.
The learning rate is a tuning parameter in an optimization algorithm that determines the step size at each iteration while moving toward a minimum of a loss function.
For gradient boosted decision trees, the learning rate controls how much each decision tree contributes to the final prediction.
The number of estimators represents the total number of boosting iterations (or trees).
In general, a lower learning rate with more trees will yield better performance and more stable models, but will take longer to train.
The number of leaves is the main parameter to control the complexity of the tree model.
Theoretically, we can set num_leaves = 2^(max_depth) to obtain the same number of leaves as depth-wise tree. In practice, just treat it as another hyperparameter.
from lightgbm import LGBMClassifier

# Create the model
model = LGBMClassifier(learning_rate=0.1, n_estimators=100, num_leaves=31)
In this code, we set the learning rate to 0.1, the number of estimators to 100, and the number of leaves to 31.
The best hyperparameters vary for different datasets, so you should try different values and see which ones work best for your data and task.
multiclass vs multiclassova Objective
LightGBM supports two algorithms for multiclass classification: multiclass (softmax) and multiclassova (One-vs-All).
The multiclass objective uses the softmax multiclass objective function while the multiclassova objective uses the One-vs-All binary objective function.
It’s not something that you need to worry about too much from an accuracy perspective, but it’s good to know that these two options exist.
By default, LightGBM uses the multiclass objective, so I will not set it explicitly in the code.
Training the Model
Now that we have set the parameters, we can train the model using the fit method.
# Train the model
model.fit(X_train, y_train)
Making Predictions
Class Predictions
Once the model is trained, we can use it to make predictions on the testing data.
The predict method of the model can be used to directly output the class of each sample in the testing data.
In this case, it will select the class with the highest probability for each sample.
# Make class predictions
y_pred = model.predict(X_test)
This code will predict the class of each sample in the testing data and store it in the y_pred variable.
Probability Predictions
In addition to predicting the class of each sample, we can also predict the probability of each class using the predict_proba method.
This can be useful if you want to know the confidence of the model in its predictions (not to be confused with the confidence interval, which is a measure of uncertainty around an estimate).
# Make probability predictions
y_prob = model.predict_proba(X_test)
This code will predict the probability of each class for each sample in the testing data and store it in the y_prob variable.
The output is an array with a shape (n_samples, n_classes) where each column contains the probability of each class.
Evaluating the Model
Accuracy
One common metric for evaluating the performance of a multiclass classification model is accuracy.
Accuracy is the ratio of the number of correct predictions to the total number of predictions.
from sklearn.metrics import accuracy_score

# Compute the accuracy
accuracy = accuracy_score(y_test, y_pred)
print('Accuracy:', accuracy)
This code computes the accuracy of the model and prints it.
However, accuracy is not always the best metric to evaluate a model, especially if the classes are imbalanced.
If one class has a lot more samples than another, the model might simply predict the majority class most of the time, leading to a high accuracy but poor ability to predict the minority class.
Log Loss
Log loss, also known as logarithmic loss or cross-entropy loss, is another metric for evaluating multiclass classification models.
It measures the performance of a classification model where the prediction input is a probability value between 0 and 1.
The goal of our machine learning model is to minimize this value.
from sklearn.metrics import log_loss

# Compute the log loss
logloss = log_loss(y_test, y_prob)
print('Log loss:', logloss)
Classification Report
Finally, we can generate a classification report, which provides a breakdown of the precision, recall, f1-score and support for each class.
Precision is the ratio of true positives to the sum of true and false positives.
Recall is the ratio of true positives to the sum of true positives and false negatives.
The F1 score is the harmonic mean of precision and recall.
Support is the number of actual occurrences of the class in the specified dataset.
from sklearn.metrics import classification_report

# Generate a classification report
report = classification_report(y_test, y_pred)
print('Classification report:\n', report)
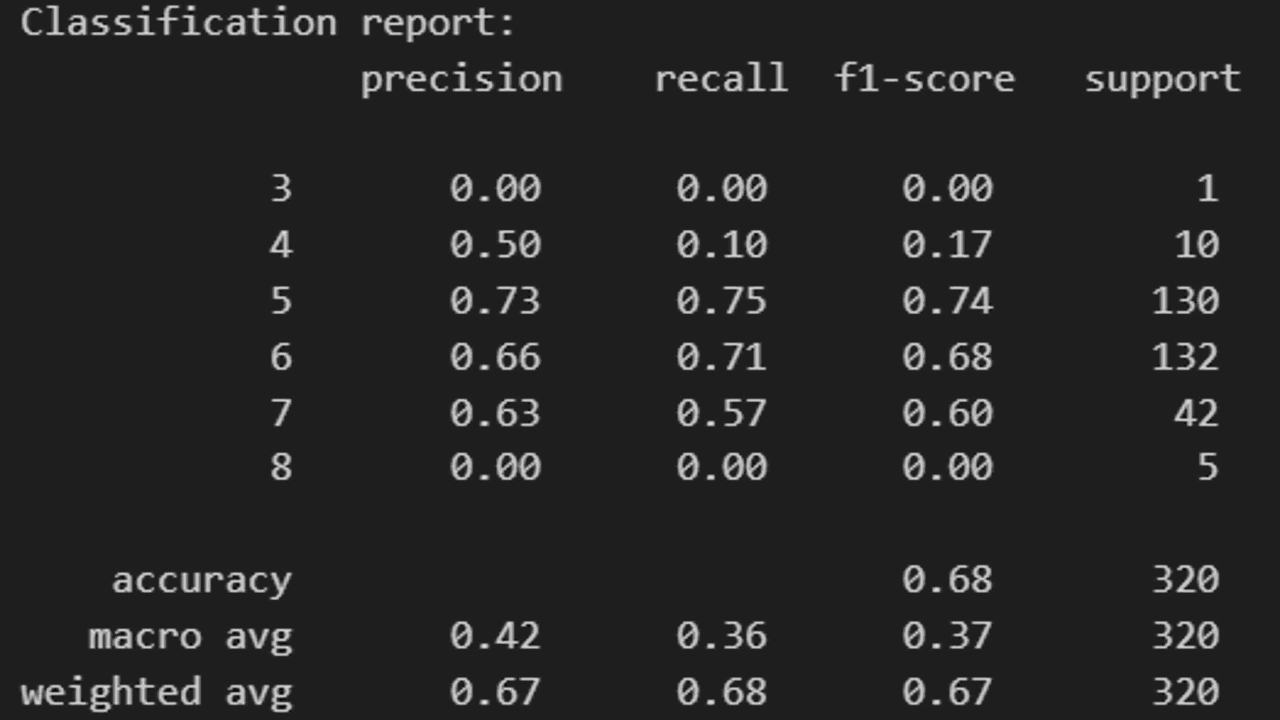
The report provides a detailed breakdown of the model’s performance for each class.